
What is n8n?
Every team has small manual jobs that quietly waste hours.
A client meeting ends, someone downloads the transcript, reads it line by line, writes a summary, pulls out requirements and decisions, creates follow-up questions, and then builds a Google Form to collect missing details. It's repetitive work, it's easy to miss things, and it delays the next step.
This is exactly where n8n helps.
n8n is an open-source workflow automation tool that lets you connect your apps, services, and APIs using a visual, drag-and-drop builder. In simple terms, you design a step-by-step flow once, and n8n runs it for you every time the trigger happens.
For example, in this workflow, the moment a meeting transcript is uploaded, n8n can automatically analyze it with AI, extract decisions and requirements, generate a structured questionnaire, and create a ready-to-share Google Form, without anyone doing it manually.
What makes n8n especially useful is that it's flexible enough for technical teams and still understandable for non-technical users:
- Business owners reduce operational load and move faster without hiring extra people.
- Marketing teams automate reporting, content flows, lead routing, and campaign ops.
- Technical teams get deeper control than typical no-code tools and can self-host for privacy and cost control.
If you've ever thought "we do this same thing every week", n8n is the tool that turns that into a reliable system.
Key Benefits: Why You Should Learn n8n
-
Significant Cost Savings
Self-hosting n8n eliminates recurring per-execution fees that can quickly add up with cloud automation platforms. For businesses running thousands of workflows monthly, this can translate to savings of $500–$5,000 per month compared to services like Zapier or Make (formerly Integromat).
-
Complete Data Control
With self-hosted n8n, your sensitive data never leaves your infrastructure. This is crucial for:
- Healthcare organizations handling PHI
- Financial institutions managing PCI data
- European companies complying with GDPR
- Any business concerned about data privacy
-
Unlimited Scalability
Unlike cloud platforms that throttle executions or charge more for higher volumes, self-hosted n8n scales with your infrastructure. You can run as many workflows as your servers can handle without additional licensing costs.
-
Active Community & Extensibility
The n8n community is one of its strongest assets:
- 400+ pre-built nodes covering popular services
- Community nodes for niche integrations
- Active forum with helpful members
- Regular updates and new features
- Open-source codebase allows custom modifications
-
Reasonable Learning Curve
While n8n requires some technical knowledge, its visual interface makes it accessible to:
- Developers who want to automate without extensive coding
- Technical product managers
- Data analysts familiar with workflows
- DevOps engineers building CI/CD pipelines
-
Future-Proof Your Skills
Learning n8n provides transferable skills:
- Understanding API integrations
- Workflow design and optimization
- AI integration patterns
- Async processing concepts
How to Choose: n8n vs Other Workflow Options
Choose n8n when you want general-purpose automation with control
- Self-hosting + data control: best if privacy, compliance, or owning your infrastructure matters.
- Multi-tool workflows: ideal when your workflow crosses many apps and APIs, not just one cloud.
- Fast to build, easy to extend: visual nodes for speed, plus webhooks/HTTP for anything custom.
Consider alternatives when your main need is specialized
- LangSmith: if your priority is LLM tracing, evaluation, monitoring, and prompt testing (observability more than automation).
- AWS Step Functions: if you're AWS-first and need cloud-native orchestration across AWS services and state machines.
- Google Cloud Workflows: if you're GCP-first and want fully managed orchestration across Google services and HTTP APIs.
n8n vs. The Competition: LangSmith, OpenAI, AWS & Google AI Builders
Understanding where n8n fits in the automation ecosystem is crucial for making informed decisions. Here's how it compares to other popular platforms:
Comparison Overview
| Feature | n8n | LangSmith | OpenAI Platform | AWS Step Functions | Google Cloud Workflows |
|---|---|---|---|---|---|
| Self-Hosting | ✅ Yes (Free) | ❌ Cloud Only | ❌ Cloud Only | ⚠️ AWS Infrastructure | ⚠️ GCP Infrastructure |
| Visual Workflow Builder | ✅ Excellent | ⚠️ Limited | ❌ Code-Based | ⚠️ Basic | ⚠️ Basic |
| Pre-built Integrations | ✅ 400+ Nodes | ⚠️ AI-Focused | ⚠️ Limited | ✅ AWS Services | ✅ Google Services |
| AI Capabilities | ✅ Multi-Provider | ✅ Advanced (LLM-Focused) | ✅ OpenAI Native | ⚠️ Requires Integration | ⚠️ Requires Integration |
| Pricing Model | Free (Self-Host) / Cloud Subscription | Usage-Based | API Usage | Per State Transition | Per Step |
| Learning Curve | ⚠️ Moderate | ⚠️ Moderate-High | ❌ High (Coding) | ❌ High (AWS Knowledge) | ❌ High (GCP Knowledge) |
| Community Support | ✅ Active & Growing | ⚠️ Growing | ✅ Large | ✅ Enterprise | ✅ Enterprise |
Real-World Use Cases: Where n8n Shines
Let's explore some practical scenarios where n8n delivers exceptional value:
-
AI-Powered Content Operations
Automatically generate blog posts, social media content, or marketing materials by connecting content management systems with AI models like GPT-4, Claude, or Gemini. For example, you could create a workflow that monitors industry news, summarizes key points using AI, and drafts social media posts for review.
-
Customer Support Automation
Build intelligent ticket routing systems that analyze customer inquiries using natural language processing, categorize them, and route to the appropriate team while generating initial response drafts. This can reduce response times from hours to minutes.
-
Data Synchronization & ETL
Keep your CRM, marketing platforms, and analytics tools in sync without manual data entry. For instance, automatically sync Salesforce contacts with Mailchimp, update Google Sheets with customer data, and trigger Slack notifications when important changes occur.
-
Meeting Intelligence
Automatically record meetings, transcribe conversations, extract action items, and distribute summaries to participants. This workflow can integrate with Zoom, Google Meet, or Microsoft Teams, process the audio through transcription services, and use AI to generate structured notes.
-
E-commerce Operations
Automate inventory management, order processing, and customer notifications. When a product is purchased, trigger workflows that update inventory across multiple platforms, generate shipping labels, and send personalized thank-you emails with product recommendations.
Getting Started: Setting Up n8n with Docker
The fastest way to get n8n running is using Docker. This approach works on Windows, Mac, and Linux, and takes just a few minutes to set up.
Prerequisites
- Docker Desktop installed on your machine
- Basic familiarity with command line operations
- At least 2GB of free RAM
Quick Start Installation
Step 1: Pull and Run n8n
Open your terminal and run the following command:
docker run -it --rm \
 --name n8n \
 -p 5678:5678 \
 -v ~/.n8n:/home/node/.n8n \
 n8nio/n8n
This command:
- Downloads the latest n8n Docker image
- Exposes the interface on port 5678
- Persists your workflows and credentials in a local directory
Step 2: Access n8n
Once the container is running, open your browser and navigate to:
http://localhost:5678You'll be greeted with the n8n setup wizard where you can create your owner account.
Production Setup (Optional)
For production use, consider using Docker Compose with environment variables for better configuration management:
version: '3.8'

services:
 n8n:
  image: n8nio/n8n
  restart: always
  ports:
    - "5678:5678"
  environment:
    - N8N_BASIC_AUTH_ACTIVE=true
    - N8N_BASIC_AUTH_USER=admin
    - N8N_BASIC_AUTH_PASSWORD=your_secure_password
    - N8N_HOST=your-domain.com
    - N8N_PROTOCOL=https
    - NODE_ENV=production
    - WEBHOOK_URL=https://your-domain.com/
  volumes:
    - ~/.n8n:/home/node/.n8n
Save this as docker-compose.yml and run:
docker-compose up -dInitial Configuration Tips
- Enable credentials encryption: Set up a secure encryption key for storing sensitive credentials
- Configure email notifications and Google Docs API: Set up SMTP settings and Google Docs API for workflow notifications
- Set up webhooks: Configure your webhook URL if you plan to receive external triggers
- Install community nodes: Explore the community nodes package to extend functionality
Real-World Workflow: AI-Powered Meeting Questionnaire Generator
This workflow demonstrates a practical, production-ready n8n automation that saves significant time by automatically generating comprehensive questionnaires from meeting transcripts. Instead of manually reviewing meeting notes and crafting questions, this workflow uses AI to extract key information and create a structured Google Form in minutes.
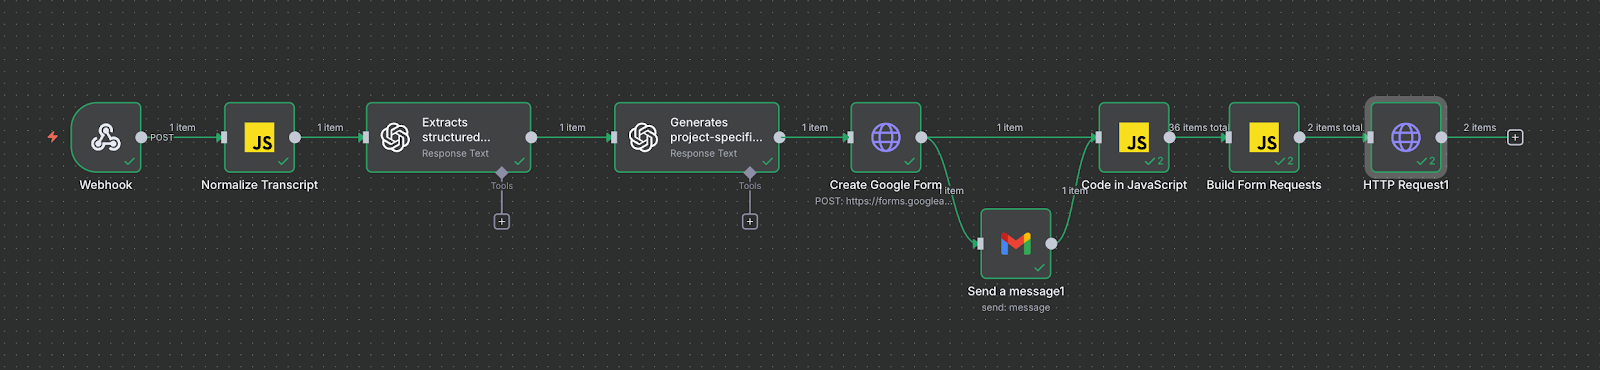
Workflow Overview
The workflow transforms raw meeting transcripts into professional questionnaires through an 8-step automation process. It handles file uploads, normalizes various text formats, uses AI for intelligent analysis and question generation, and automatically creates shareable Google Forms.


Step-by-Step Implementation
Step 1: Webhook Trigger (File Upload)
The workflow begins with a Webhook node configured to accept file uploads via a POST endpoint at /meeting-transcript.
- Configuration:
- HTTP Method: POST
- Path:
meeting-transcript - Response Mode: Last Node
- Binary Property Name:
file
Users can upload meeting transcripts in various formats (.txt, .json, or raw text) to this webhook URL, which triggers the entire automation.
Step 2: Normalize Transcript (Code Node)
A JavaScript Code node processes the uploaded file and normalizes it into a consistent JSON structure with a meetingText property.
What this code does:
- Detects the file type from MIME type (
text/plain,application/json, etc.) - Extracts text content from uploaded files
- Handles multiple input formats: binary file uploads or raw body text
- Provides helpful error messages for unsupported formats (PDF/DOCX)
- Outputs a standardized
json.meetingTextfield for downstream processing
// Normalize transcript from Webhook into json.meetingText
// Handles file uploads (binary.file) or raw body text (json.body)

const inputItems = $input.all();
const outputItems = [];

for (const item of inputItems) {
 const json = item.json || {};
 const binary = item.binary || {};
 const binaryFile = binary.file;

 let meetingText = "";

 if (binaryFile) {
   const mime = binaryFile.mimeType || "";
   const buffer = Buffer.from(binaryFile.data, "base64");

   if (mime.startsWith("text/")) {
     meetingText = buffer.toString("utf8");
   } else if (mime === "application/json") {
     const jsonStr = buffer.toString("utf8");
     let parsed = JSON.parse(jsonStr);
     meetingText = parsed.transcript || parsed.meetingText || parsed.text || jsonStr;
   } else if (mime === "application/pdf" ||
           mime ===
"application/vnd.openxmlformats-officedocument.wordprocessingml.document") {
     throw new Error("PDF/DOCX not yet supported - please upload .txt or .json");
   } else {
     throw new Error("Unsupported file type: " + mime);
   }
 } else if (json.body) {
   meetingText = json.body;
 } else {
   throw new Error("No file or body found in webhook payload.");
 }

    outputItems.push({ json: { meetingText: meetingText } });
}

return outputItems;
Step 3: AI Analysis (OpenAI Node – GPT-4o)
The first AI node analyzes the meeting transcript and extracts structured information using GPT-4o.
System Prompt:
"You are an expert business analyst. Your task is to analyze meeting transcripts,
extract important information accurately, and produce structured JSON output."
User Prompt Template:
Here is the meeting transcript:

{{ $json["meetingText"] }}

Extract the following information:

1. Summary of the meeting (5–7 bullet points)
2. Functional requirements
3. Non-functional requirements
4. Decisions made
5. Timeline or deadlines mentioned
6. Risks or concerns
7. Missing information or clarifications needed

Return the result as valid JSON with this structure (no extra text, no code fences):
{
    "summary": [],
    "functional_requirements": [],
    "non_functional_requirements": [],
    "decisions_made": [],
    "timeline": [],
    "risks": [],
    "missing_information": []
}
Why this works: By requesting structured JSON output, we ensure the AI's response can be reliably parsed and used in subsequent steps. The specific categories cover all essential aspects of project meetings.
Step 4: Generate Questions (OpenAI Node – GPT-4.1)
The second AI node takes the structured meeting analysis and generates a comprehensive questionnaire tailored to the project needs.
System Prompt:
"You are a professional consultant who prepares clear, structured questionnaires for
clients based on project requirements."
User Prompt Template:
Based on the following extracted meeting information (in JSON format):

{{ $json["output"][0]["content"][0]["text"] }}

Create a detailed questionnaire for the client with 12–18 questions to:

- Validate functional requirements
- Validate non-functional requirements
- Clarify scope and expectations
- Clarify AI-based features
- Clarify timeline and constraints
- Reveal any missing details per department

Format the output as a simple numbered list, like:

1. Question 1...
2. Question 2...
3. Question 3...
Why 12–18 questions? This range is comprehensive enough to cover all critical areas without overwhelming respondents. The AI adapts the questions based on what was actually discussed in the meeting.
Step 5: Create Google Form (HTTP Request Node)
An HTTP Request node creates a new Google Form via the Google Forms API.
- Method: POST
- URL:
https://forms.googleapis.com/v1/forms - Authentication: Google OAuth2 (using Google Docs API credentials)
- Body:
{
    "info": {
      "title": "Meeting Questionnaire",
      "documentTitle": "Meeting Questionnaire"
    }
}
This creates an empty form and returns a formId that's used in subsequent steps.
Step 6: Parse Questions (Code Node)
This JavaScript node parses the AI-generated numbered list into individual question items.
// Parse questions from AI output into individual items
const text = $node["Message a model1"].json.output[0].content[0].text;

if (!text) {
  throw new Error('Could not find text in AI response');
}

const lines = text
 .split('\n')
 .map(l => l.trim())
 .filter(l => l !== '');

const questions = [];

for (const line of lines) {
  // Remove numbering like "1. ", "2. "
  const cleaned = line.replace(/^\d+\.\s*/, '').trim();
  if (cleaned) {
    questions.push({ json: { question: cleaned } });
  }
}

return questions;
This transforms the numbered list into an array where each item contains one question, making it easy to iterate in the next step.
Step 7: Build Form Requests (Code Node)
This node transforms the parsed questions into the exact JSON structure that Google Forms' batchUpdate API expects.
// Build batchUpdate requests for Google Forms API
const questions = $items("Code in JavaScript");

const requests = questions.map((item, index) => ({
  createItem: {
    item: {
      title: item.json.question,
      questionItem: {
        question: {
          textQuestion: {}
        }
      }
    },
    location: {
      index
    }
  }
}));

return [{
  json: { requests }
}];
Each question becomes a text input field in the Google Form, positioned in the order they were generated by the AI.
Step 8: Add Questions to Form (HTTP Request Node)
The final HTTP Request node adds all questions to the Google Form using the batchUpdate endpoint.
- Method: POST
- URL:
https://forms.googleapis.com/v1/forms/{{ $node["Create Google Form"].json["formId"] }}:batchUpdate - Body: The
{{ $json }}from the previous node (containing the requests array)
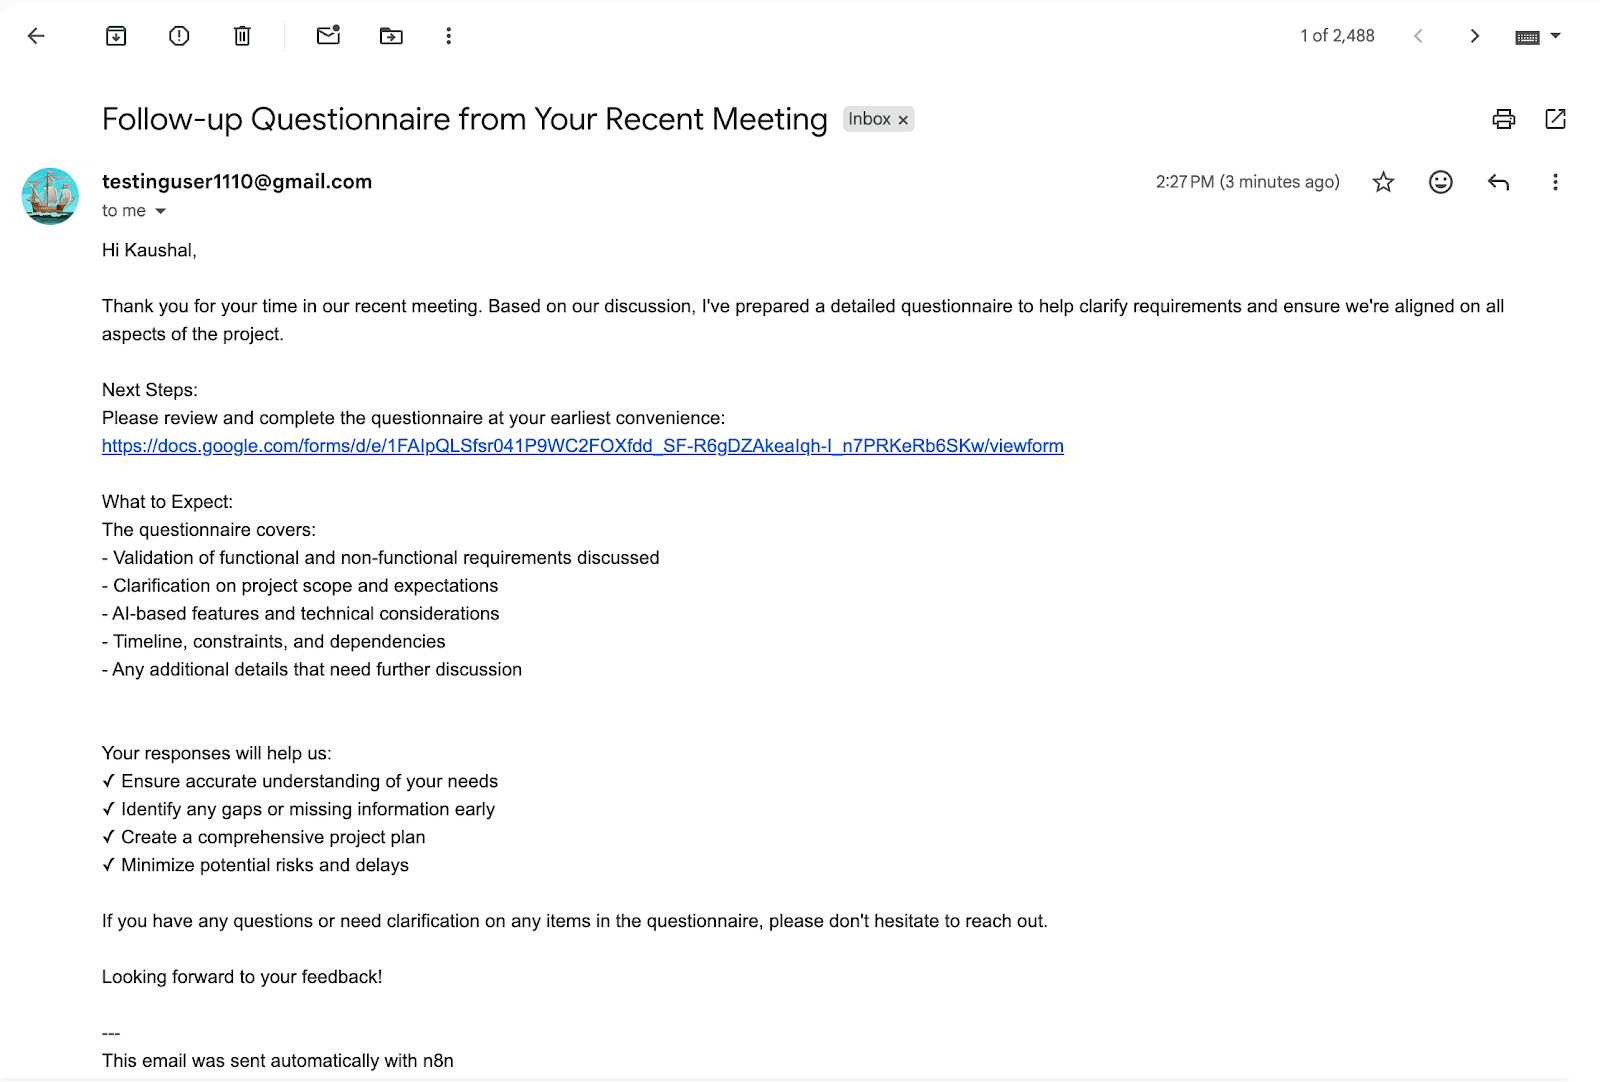
This single API call adds all questions to the form simultaneously, and the workflow returns the form URL that can be shared with meeting participants.
Key Benefits of This Workflow
- Time savings: What would take 30–60 minutes manually takes under 2 minutes
- Consistency: Every questionnaire follows a structured approach covering all critical areas
- AI-powered intelligence: Questions are tailored to what was actually discussed in the meeting
- Immediate sharing: Google Forms are instantly shareable with participants
- Scalability: Handle unlimited meetings without additional manual effort
Potential Enhancements
- Add PDF/DOCX support: Integrate a document parsing node (like pdf-parse) in Step 2
- Email automation: Add a Gmail node to automatically send the form to meeting participants
- Response tracking: Set up a webhook to capture form responses and store them in a database
- Multi-language support: Add translation nodes to generate questionnaires in different languages
- Question types: Modify Step 7 to create multiple choice, checkbox, or dropdown questions based on AI recommendations
- Version control: Store questionnaires in Notion or Airtable for historical tracking
Testing the Workflow
To test this workflow, send a POST request to your webhook URL with a sample meeting transcript:
curl -X POST https://your-n8n-instance.com/webhook/meeting-transcript \
 -H "Content-Type: application/json" \
 -d '{
    "body": "In todays meeting, we discussed the Q2 product roadmap. Sarah will lead the mobile app redesign with a target launch date of March 15. Key requirements include offline mode, push notifications, and dark mode support. Budget approved at $50,000. John raised concerns about the API integration timeline."
 }'
Or upload a text file:
curl -X POST https://your-n8n-instance.com/webhook/meeting-transcript \
 -F "file=@meeting-notes.txt"
The workflow will process the transcript and return a Google Form URL that you can immediately share with your team.
Best Practices & Tips
Workflow Design Best Practices
- Keep workflows focused: Create separate workflows for distinct processes rather than one massive workflow
- Use error handling: Always add error workflow nodes to catch and handle failures gracefully
- Add descriptive notes: Document complex logic directly in the workflow canvas using note nodes
- Version control your workflows: Export workflows as JSON and commit them to Git regularly
- Test with sample data: Use the "Execute Workflow" feature with test data before going live
Performance Optimization
- Batch operations: Process multiple items together rather than triggering individual workflows
- Use queues for heavy processing: Implement message queues (Redis, RabbitMQ) for resource-intensive tasks
- Cache API responses: Store frequently accessed data to reduce external API calls
- Monitor execution times: Regularly review workflow performance and optimize slow nodes
Security Best Practices
- Rotate credentials regularly: Update API keys and passwords on a schedule
- Use environment variables: Store sensitive configuration outside workflow definitions
- Implement webhook authentication: Secure webhook endpoints with tokens or signatures
- Limit network access: Use firewalls to restrict n8n access to trusted networks
- Regular backups: Backup your n8n data directory frequently
Common Pitfalls to Avoid
- Infinite loops: Be careful with trigger conditions to avoid workflows that call themselves endlessly
- Rate limit violations: Respect API rate limits by adding delays or implementing queues
- Hardcoded values: Use variables and expressions instead of hardcoding values that may change
- Ignoring error states: Always plan for what happens when an API is down or returns unexpected data
- Over-complicating workflows: Sometimes a simple script is better than an elaborate n8n workflow
Pro Tips for Efficiency
- Master expressions: Learn n8n's expression syntax to manipulate data directly in nodes
- Use subworkflows: Create reusable workflow components for common patterns
- Leverage templates: Start from community templates and customize them
- Set up monitoring: Use the execution log and set up alerts for failed workflows
- Join the community: Participate in the n8n forum and Discord for tips and troubleshooting
Conclusion: Your Next Steps with n8n
Learning n8n opens up a world of automation possibilities that can transform how you work, whether you're a developer, entrepreneur, or part of a larger organization. The combination of visual workflow design, extensive integrations, and self-hosting capabilities makes it a powerful tool in 2026's automation landscape.
Recommended Learning Path
- Week 1: Set up n8n and complete 3–5 basic workflows from the template library
- Week 2: Build the meeting notes workflow from this tutorial and customize it for your needs
- Week 3: Create a workflow that solves a real problem in your daily work
- Week 4: Explore advanced features like subworkflows, custom nodes, and error handling
Essential Resources
- Official Documentation: https://docs.n8n.io/ – Comprehensive guides and node references
- Community Forum: https://community.n8n.io/ – Get help and share workflows
- YouTube Channel: Official n8n channel with video tutorials and use case demos
- GitHub Repository: https://github.com/n8n-io/n8n – Source code and issue tracking
- Template Library: Browse hundreds of pre-built workflows for inspiration
Join the Automation Revolution
The future of work is automated, intelligent, and interconnected. n8n gives you the tools to build that future today. Whether you're automating personal tasks, building business processes, or creating AI-powered applications, n8n provides the foundation you need to succeed.
Start with the Docker setup we covered, build the meeting notes workflow, and then let your imagination guide you. The n8n community is here to support your journey, and every workflow you create will teach you something new about automation, integration, and the power of connected systems.